画像をリサイズする
カンファレンスのページデザインでは、画像の最大サイズは200x150ピクセルとして制限しています。アップロードされた画像がこの制限を超えていた際にサイズを変更し最適化するようにしてみましょう。
これはコメントのワークフローに追加する良い作業になります。コメントがバリデートされた直後でかつ公開する直前にが良いタイミングですね。
ready 状態と optimized 遷移を新しく追加しましょう:
1
2
3
4
5
6
7
8
9
10
11
12
13
14
15
16
17
18
19
20
21
22
23
24
25
26
27
28
29
--- i/config/packages/workflow.yaml
+++ w/config/packages/workflow.yaml
@@ -16,6 +16,7 @@ framework:
                 - potential_spam
                 - spam
                 - rejected
+                - ready
                 - published
             transitions:
                 accept:
@@ -29,13 +30,16 @@ framework:
                     to:   spam
                 publish:
                     from: potential_spam
-                    to:   published
+                    to:   ready
                 reject:
                     from: potential_spam
                     to:   rejected
                 publish_ham:
                     from: ham
-                    to:   published
+                    to:   ready
                 reject_ham:
                     from: ham
                     to:   rejected
+                optimize:
+                    from: ready
+                    to:   published
新しいワークフロー設定の視覚表現を生成して、ここで行いたいことが記述されていることを検証します:
1
$ symfony console workflow:dump comment | dot -Tpng -o workflow.png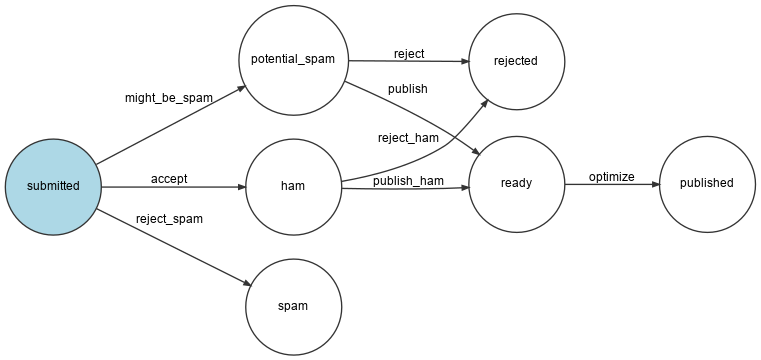
Imagine で画像を最適化する
画像の最適化は、 GD と Imagine を使います(ローカルの PHP にGD拡張がインストールされていることを確認してください):
1
$ symfony composer req "imagine/imagine:^1.2"画像のリサイズは次のサービスクラスを介して行います:
src/ImageOptimizer.php
1
2
3
4
5
6
7
8
9
10
11
12
13
14
15
16
17
18
19
20
21
22
23
24
25
26
27
28
29
30
31
32
33
namespace App;

use Imagine\Gd\Imagine;
use Imagine\Image\Box;

class ImageOptimizer
{
    private const MAX_WIDTH = 200;
    private const MAX_HEIGHT = 150;

    private $imagine;

    public function __construct()
    {
        $this->imagine = new Imagine();
    }

    public function resize(string $filename): void
    {
        list($iwidth, $iheight) = getimagesize($filename);
        $ratio = $iwidth / $iheight;
        $width = self::MAX_WIDTH;
        $height = self::MAX_HEIGHT;
        if ($width / $height > $ratio) {
            $width = $height * $ratio;
        } else {
            $height = $width / $ratio;
        }

        $photo = $this->imagine->open($filename);
        $photo->resize(new Box($width, $height))->save($filename);
    }
}
オリジナルの画像をキープしておきたいと思うかもしれませんが、ここでは、画像を最適化した後に、新しいファイルをオリジナルと取り替えて格納します。
ワークフローに新しいステップを追加する
ワークフローを変更して新しい状態を処理します:
1
2
3
4
5
6
7
8
9
10
11
12
13
14
15
16
17
18
19
20
21
22
23
24
25
26
27
28
29
30
31
32
--- i/src/MessageHandler/CommentMessageHandler.php
+++ w/src/MessageHandler/CommentMessageHandler.php
@@ -2,6 +2,7 @@

 namespace App\MessageHandler;

+use App\ImageOptimizer;
 use App\Message\CommentMessage;
 use App\Repository\CommentRepository;
 use App\SpamChecker;
@@ -25,6 +26,8 @@ class CommentMessageHandler
         private WorkflowInterface $commentStateMachine,
         private MailerInterface $mailer,
         #[Autowire('%admin_email%')] private string $adminEmail,
+        private ImageOptimizer $imageOptimizer,
+        #[Autowire('%photo_dir%')] private string $photoDir,
         private ?LoggerInterface $logger = null,
     ) {
     }
@@ -54,6 +57,12 @@ class CommentMessageHandler
                 ->to($this->adminEmail)
                 ->context(['comment' => $comment])
             );
+        } elseif ($this->commentStateMachine->can($comment, 'optimize')) {
+            if ($comment->getPhotoFilename()) {
+                $this->imageOptimizer->resize($this->photoDir.'/'.$comment->getPhotoFilename());
+            }
+            $this->commentStateMachine->apply($comment, 'optimize');
+            $this->entityManager->flush();
         } elseif ($this->logger) {
             $this->logger->debug('Dropping comment message', ['comment' => $comment->getId(), 'state' => $comment->getState()]);
         }
前回のステップで、変数名 $photoDir をコンテナの parameter を定義したので自動的にインジェクトされます:
config/services.yaml
1
2
parameters:
    photo_dir: "%kernel.project_dir%/public/uploads/photos"
本番でアップロードされたデータを格納する
.platform.app.yaml にファイルアップロードのためのディレクトリを読み書き可能として既に定義してあります。しかし、このマウントポイントはローカルのままです。Webコンテナやメッセージ取得処理ワーカーが同じマウントポイントにアクセスできるようにするには、 ファイルサービス を作成する必要があります:
1
2
3
4
5
6
7
8
9
10
--- i/.platform/services.yaml
+++ w/.platform/services.yaml
@@ -12,3 +12,7 @@ varnish:
         vcl: !include
             type: string
             path: config.vcl
+
+files:
+    type: network-storage:2.0
+    disk: 256
画像のアップロードディレクトリで使用してください:
1
2
3
4
5
6
7
8
9
10
11
--- i/.platform.app.yaml
+++ w/.platform.app.yaml
@@ -31,7 +31,7 @@ web:

 mounts:
     "/var/cache": { source: local, source_path: var/cache }
-    "/public/uploads": { source: local, source_path: uploads }
+    "/public/uploads": { source: service, service: files, source_path: uploads }


 relationships:
これで本番で正しく機能するようになりました。
This work, including the code samples, is licensed under a
Creative Commons BY-NC-SA 4.0 license.